Learning to draw a volleyball accurately is crucial for various reasons. For artists, it provides an opportunity to develop fundamental drawing skills, such as understanding shapes, proportions, and perspective.
For sports enthusiasts, it can be a fun way to express passion for the game and even create custom artwork for team logos or posters.

Additionally, accurately drawing a volleyball is essential for instructional materials, where clarity and precision are paramount.
In this article, you will be guided through a step-by-step process to draw a volleyball. The instructions are designed with beginners in mind, but artists of all skill levels can benefit from the techniques and tips discussed.
By the end of this guide, you’ll be able to create a realistic volleyball drawing and have the foundational skills to explore different styles and perspectives.
Materials and Tools Required
Before you start drawing a volleyball on paper, it’s essential to gather all the necessary materials and tools. Using the right tools will not only make the drawing process more manageable, but it will also help you achieve a more polished and accurate final result.
Paper or sketchbook

Select a suitable paper or sketchbook that can handle the graphite or mechanical pencil you plan to use. A medium-weight paper with a smooth surface is ideal for most pencil drawings.
Graphite or mechanical pencils
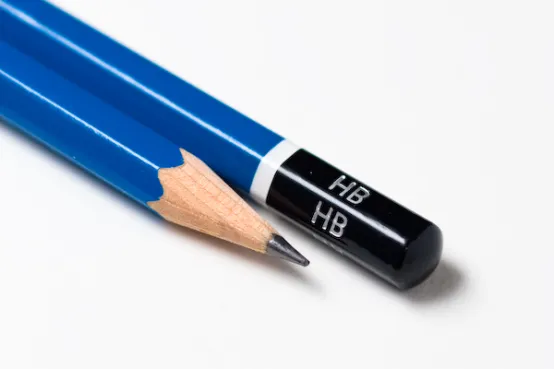
Choose a graphite or mechanical pencil that feels comfortable in your hand and provides you with the desired level of control. A 2B or HB pencil is suitable for sketching, while a softer pencil like 4B or 6B can be used for shading and adding details.
Eraser

A good-quality eraser is essential for fixing mistakes and refining your drawing. A white vinyl eraser or a kneaded eraser is ideal for effectively removing pencil marks without damaging the paper.
Ruler (optional)
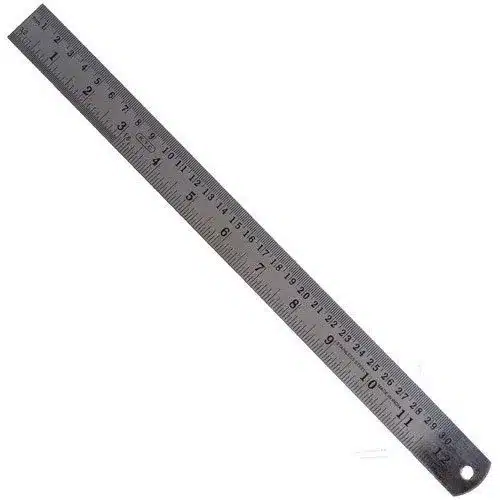
While not strictly necessary, a ruler can be helpful in drawing straight lines and maintaining proportions. It can also be used as a guide when sketching the initial guidelines for your volleyball drawing.
Compass (optional)

Drawing a perfect circle can be challenging, especially for beginners. Using a compass can help you create a precise circle for your volleyball.
If you don’t have a compass or prefer not to use one, you can still achieve a reasonably accurate circle using the freehand technique, which will be discussed later in the article.
Basic Drawing Principles
In the world of art, understanding the fundamental principles is key to creating visually appealing and accurate drawings.
Basic drawing principles, such as recognizing shapes and proportions, breaking down complex objects into simpler shapes, and sketching lightly before finalizing lines, are essential building blocks for artists of all skill levels.
By mastering these principles, you will not only improve your ability to draw a volleyball but also enhance your overall drawing capabilities, paving the way for a more complex and expressive artwork.
Understanding shapes and proportions
When drawing any object, it’s crucial to understand the underlying shapes and proportions. This principle is especially important when drawing a volleyball, as it is primarily composed of a perfect circle and curved lines.
Analyzing the volleyball’s structure will help you maintain the correct proportions throughout your drawing and make your final result more realistic.
Breaking down complex objects into simple shapes
One effective way to approach drawing is to break down complex objects into simpler shapes.
For a volleyball, this means starting with a circle and adding guidelines to divide the circle into sections.
By focusing on these simpler shapes and gradually adding details, you’ll find the drawing process more manageable, and your final result will be more accurate.
Sketching lightly before finalizing lines
When drawing, it’s essential to start with light, loose sketches before committing to your final lines. This approach allows you to make adjustments and corrections more easily as you work through the drawing process.
Sketching lightly also helps prevent damage to the paper surface, as heavy pencil marks can be difficult to erase completely.
Once you have established the basic structure of your volleyball and are satisfied with its proportions and positioning, you can then gradually darken and refine your lines for a polished finish.
Step-by-Step Guide to Drawing a Volleyball on Paper
Drawing a volleyball may seem like a simple task, but capturing its unique details and proportions can be a challenge.
In this step-by-step guide, we’ll walk you through the process of drawing a volleyball on paper, ensuring that your final result is both accurate and visually appealing.
By following these easy-to-understand steps, you’ll not only learn how to create a convincing volleyball drawing but also develop valuable skills that can be applied to a wide range of artistic endeavors.
How to Draw a Volleyball
So, grab your pencil and paper, and let’s get started on this exciting journey!
Step #1 Draw a circle
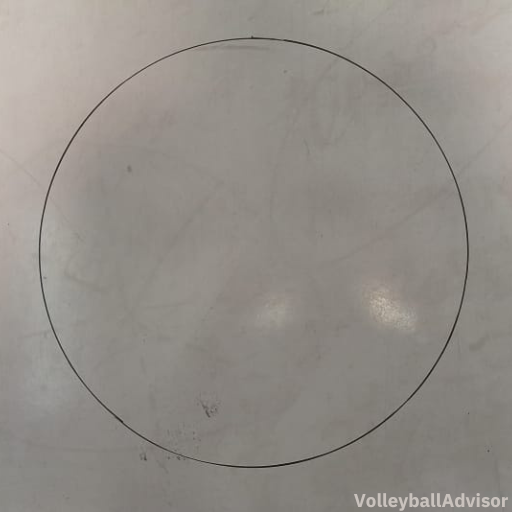
Start by drawing a circle, which will serve as the base for your volleyball. You can use a compass or trace a round object to ensure a perfect circle.
Step #2 Divide the circle into three equal parts
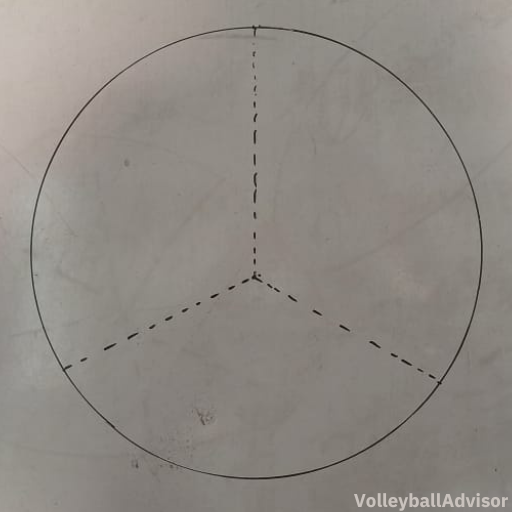
To do this, draw three dotted lines that intersect at the center of the circle, forming a “Y” shape. Make sure the angles between each pair of lines are equal, which should be approximately 120 degrees.
Step #3 Draw three curved panels
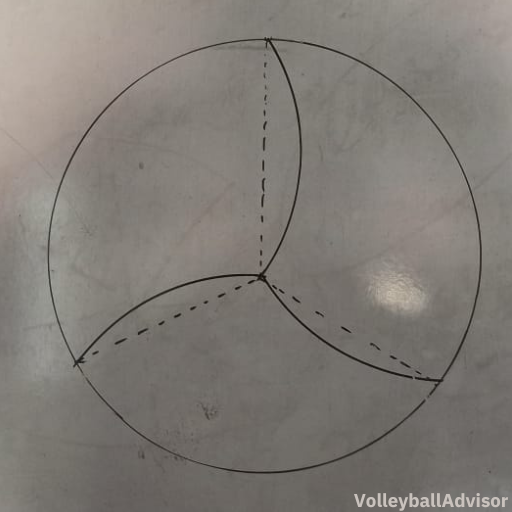
Use the dotted lines as a reference to draw three curved panels. Each panel should start from the center of the circle and extend outwards, following the curved edge of the circle, and end at the outer edge. The panels should be symmetrical and evenly spaced around the circle.
Step #4 Remove the dotted lines:
Once you have drawn the three curved panels, erase the dotted lines to leave only the panels visible.
Step #5 Create additional curved lines
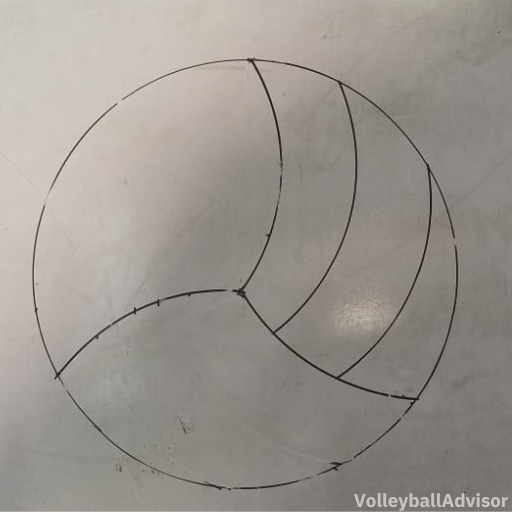
For each curved line that forms the outer edge of a panel, draw two more curved lines parallel to it, at an equal distance from the original line and each other. These lines should follow the curve of the panel and end at the edge of the circle.
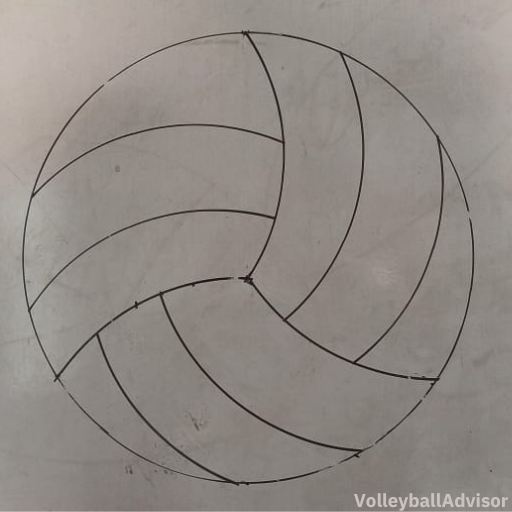
Step #6 Add details:

You can now add some shading or coloring to the panels to give your volleyball drawing a more realistic appearance. If desired, you can also add the logo of a volleyball brand or write the word “Volleyball” on one of the panels.
Tips for Enhancing Your Volleyball Drawing on Paper
Practicing different perspectives and angles
To improve your volleyball drawing skills, practice drawing the ball from various perspectives and angles.
This exercise will help you develop a better understanding of how the volleyball’s shape and appearance change in different positions.
Additionally, mastering different angles will enable you to create more dynamic and engaging compositions in your artwork.
Incorporating the volleyball into dynamic scenes
Once you are comfortable drawing a volleyball, try incorporating it into dynamic scenes featuring players, action, and movement.
By adding a background and context to your volleyball drawings, you can create compelling illustrations that tell a story or capture the excitement of the game.
This practice will also help you develop your overall drawing skills by challenging you to draw human figures, motion, and different environments.
Experimenting with different art styles and techniques
Experimenting with various art styles and techniques can add a unique and personal touch to your volleyball drawings.
Try exploring different approaches, such as realism, impressionism, or even comic book-style illustrations.
You can also experiment with different mediums, such as colored pencils, charcoal, or ink, to add variety and depth to your artwork.
By trying new styles and techniques, you’ll expand your artistic repertoire and discover new ways to express your passion for volleyball through your drawings.
Conclusion
In this article, we have provided a step-by-step guide to help you draw a volleyball on paper.
By following the steps and principles outlined, you’ll learn to create an accurate and realistic representation of a volleyball.
Remember to start with a perfect circle, sketch the main guidelines, draw the panels, add details and shading, and finalize your drawing by cleaning up your lines and adding highlights.
Drawing is a skill that improves with practice and exploration. We encourage you to continue practicing your volleyball drawings from different angles and perspectives, incorporating the ball into dynamic scenes, and experimenting with various art styles and techniques.
As you gain experience and confidence in your abilities, you’ll discover your unique artistic voice and find new ways to express your love for volleyball through your artwork.
To further develop your drawing skills and find inspiration, consider exploring additional resources such as art tutorials, books, and online forums.
Social media platforms like Instagram, Pinterest, and YouTube can provide an abundance of art demonstrations and ideas from fellow artists.
Additionally, attending local art classes or workshops can provide valuable hands-on experience and the opportunity to learn from experienced instructors.
By tapping into these resources, you’ll continue to grow as an artist and take your volleyball drawings to new heights.